OAuth 2
Important!
Never provide your access_token, refresh_token or client_secret to a web browser or other end-user agent. Instead, maintain a separate session and persist this data in a location accessible only by your application (e.g. do not store the access_token in a cookie).
Contact api-support@sparkplatform.com for further guidance.
If you are not sure which authentication method to use, please read the Overview page.
All requests, including requests after the OAuth 2 authorization has been granted, must be made using HTTPS.
The Spark® API currently supports draft 10 of the OAuth 2 specification. Note that some developers will have a "single session" OAuth 2 key with an access_token and refresh_token already provided to them. Developers with these keys can skip steps one and two, starting instead at Requesting Data.
The Spark API also supports the Resource Owner Password Credentials flow for certain developers granted special permissions for retrieving an access_token on behalf of the end user. Developers using this flow will start here.
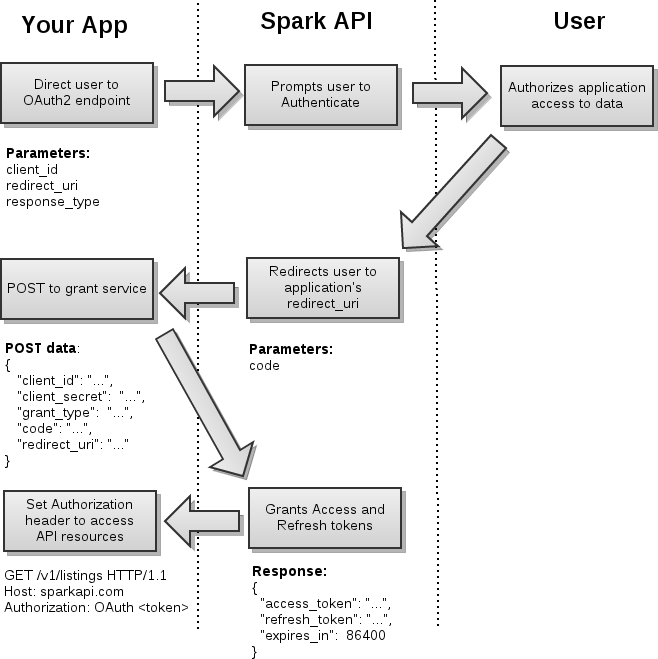
The typical OAuth 2 flow with Spark API can be broken down into four steps:
- Obtaining User Authorization
- Token Exchange
- Requesting Data
- Refreshing Expired Sessions
- Deleting Sessions
 i
i
Obtaining User Authorization
See also section 3 of the OAuth 2 spec.
Obtaining user authorization requires you to redirect the end-user to the appropriate endpoint with the required parameters provided. Once they have authorized your application, they will be redirected back to your redirect_uri with the access code provided in the URI.
API Endpoints:
| SESSION ROLE | OAuth 2 endpoint URI | Notes |
|---|---|---|
| IDX | https://sparkplatform.com/oauth2 |
|
| VOW |
There are two VOW endpoints to choose from when building a consumer-facing applications.
Portal.Name parameter must be replaced with the agent's portal name,
e.g. a portal with the name MyPortal would have an endpoint URI of https://sparkplatform.com/auth/vow/myportal.
|
Additional services for VOW authentication can be accessed in the authentication service documentation. |
| Private | https://sparkplatform.com/oauth2 |
Parameters:
client_id: your unique client key, provided to you by FBS.mls: (optional, VOW only) If present, consumers will only be able to select agents from the mls with theIdprovided.redirect_uri: the URI that you'd like the OAuth endpoint to redirect to after successfully authenticating the user. The URI you provide to us must match the URI we have on record for your key.redirect_when_no_connected_agents: (optional, VOW only) If present, consumers will be redirected back to theredirect_uriif they have no agents to work with.response_type: this should always be set tocode.state: an optional parameter that will be returned to yourredirect_uri.unconnected: (VOW only, MLS-level portals only) If present, consumers that sign up for an account at that endpoint will be created as unconnected consumers. This value will betruewhen the portal is specified in the OAuth2 endpoint:https://sparkplatform.com/auth/vow/myportal?unconnected=trueWhen using the standard vow endpoint, the value will be the portal name of the user you'll want the unconnected contact to be created under:https://sparkplatform.com/auth/vow?unconnected=myportal
To initiate the user authorization flow, assemble the appropriate URI parameters in your client and redirect the user to our endpoint. Note that, from there, the user experience will be out of your hands until the end user is redirected to your redirect_uri
https://sparkplatform.com/oauth2?response_type=code&client_id=[client_id]&redirect_uri=[redirect_uri]
When the end user authorizes your application to access their data, the endpoint redirects the user to your callback specified by your redirect_uri parameter. Attached to this URI is the code parameter, which is necessary to complete the grant request later. At this point, user experience will be back in your control.
https://my.site.com/callback?code=[access_code]
If an error occurs in the authorization process, the code parameter will be omitted. Be prepared to handle the parameters error and error_description in these events.
https://my.site.com/callback?error=redirect_uri_mismatch&error_description=Parameter+redirect_uri+does+not+match+registered+URIToken Exchange
See also section 4.1.1 of the OAuth 2 spec.
After the end user has successfully authorized your application, you must exchange your access code for an access_token by POSTing the the following data to the https://sparkapi.com/v1/oauth2/grant resource:
Sample POST Request Body
{
  "client_id": "[client_id]",
  "client_secret":  "[client_secret]",
  "grant_type": "authorization_code",
  "code": "[code]",
  "redirect_uri": "[redirect_uri]"
}| Attribute | Description |
|---|---|
client_id |
This is your OAuth client ID provided by FBS. |
client_secret |
This is your OAuth client secret provided by FBS. |
grant_type |
This is always set to authorization_code . |
code |
This is the value of the code obtained in step 1. |
redirect_uri |
The value of the URI to which the user will be redirected upon completion. The domain must match that which is registered with FBS. (We encourage you to use HTTPS for your redirect URI.) |
Sample Successful Response Body: HTTP status 200
(see also section 3.1 of the OAuth 2 spec)/p>
{
  "access_token": "[access_token]",
  "refresh_token": "[refresh_token]",
  "expires_in":  86400
}
Sample Failed Response Body: HTTP status > 299
(see also section 3.2.1 of the OAuth 2 spec)
{
  "error": "[error_code]",
  "error_description": "Detailed message here"
}
Resource Owner Authorization
See also section 4.1.2 of the OAuth 2 spec.
In this instance, you retrieve your access token by prompting the end user for their username and password and sending those directly to the
https://sparkapi.com/v1/oauth2/grant resource and receive the json response directly from the request.
username or password. The expectation is that you will store the
access_token and continue in the manner as if you went through the traditional authorization_code flow to obtain your access_token.
Sample POST Request Body
{
  "client_id": "[client_id]",
  "client_secret":  "[client_secret]",
  "grant_type": "password",
  "username": "[username]",
  "password": "[password]"
}| Attribute | Description |
|---|---|
client_id |
This is your OAuth client ID provided by FBS. |
client_secret |
This is your OAuth client secret provided by FBS. |
grant_type |
This is always set to password . |
username |
This is the username supplied by the end user. |
password |
This is the password supplied by the end user. |
Sample Successful Response Body: HTTP status 200
(see also section 3.1 of the OAuth 2 spec)
{
  "access_token": "[access_token]",
  "refresh_token": "[refresh_token]",
  "expires_in":  86400
}
Sample Failed Response Body: HTTP status > 299
(see also section 3.2.1 of the OAuth 2 spec)
{
  "error": "[error_code]",
  "error_description": "Detailed message here"
}
Requesting Data
See also section 5.1.1 of the OAuth 2 spec.
Once you have your access_token, you can request data by placing it in the Authorization header for each request:
Authorization: OAuth [access_token]Note that when using OAuth 2, all requests must be made over HTTPS.
Refreshing Expired Sessions
Access tokens expire after 24 hours, yet it would be undesirable to have to redirect end users to the OAuth 2 authorization flow once a day. The refresh flow is a remedy to this.
Sample Session Expired Response Header and Body
HTTP/1.1 401 Unauthorized
WWW-Authenticate: OAuth realm='Flexmls API', error='expired_token'
{
  "D": {
    "Success": false,
    "Message": "Session token has expired",
    "Code": 1020
  }
}
To refresh the access token, POST the following JSON data to the API's OAuth Access Token service at https://sparkapi.com/v1/oauth2/grant using HTTPS:
Sample POST Request Body
{
  "client_id": "[client_id]",
  "client_secret":  "[client_secret]",
  "grant_type": "refresh_token",
  "refresh_token": "[refresh_token]"
}| Parameter | Description |
|---|---|
client_id |
This is your OAuth client ID provided by FBS. |
client_secret |
This is your OAuth client secret provided by FBS. |
grant_type |
Set this to refresh_token . |
refresh_token |
This is the value of the refresh token obtained from the initial access token grant. |
Sample Successful Response Body: HTTP status 200
(see also section 3.1 of the OAuth 2 spec)
{
  "access_token": "example_new_access_token",
  "refresh_token": "example_new_refresh_token",
  "expires_in":  86400
}
Sample Failed Response Body: HTTP status > 299
(see also section 3.2.1 of the OAuth 2 spec)
{
  "error": "[error_code]",
  "error_description": "Detailed message here"
}
Deleting Sessions
/<API Version>/oauth2/token/<Token>
| HTTP Method | Description | Notes |
|---|---|---|
| DELETE | Destroy an existing token. |
Delete Request
Parameters:
- None
DELETE Response
The standard success/fail response is returned.